
Commercial Biohazard Cleanup in Dallas: A Guide for Businesses

A customer collapses in your store. An employee is hurt on the warehouse floor. A guest dies in a hotel room, or someone breaks in and leaves blood behind. When a biohazard happens at a Dallas business, you have two problems at once: getting the space safe and getting back to work. This guide covers what counts as a commercial biohazard, what you’re responsible for as an employer, what your staff shouldn’t touch, and how professional cleanup gets you reopened quickly.

What counts as a commercial biohazard?

A biohazard is any biological material that can carry disease, and in a business setting that usually means blood or other potentially infectious bodily fluids. The calls we get from Dallas businesses tend to fall into a few groups:

Situation Typical settings
Workplace injuries Warehouses, manufacturing, construction sites, kitchens
Assaults, break-ins and crime scenes Retail stores, bars, parking garages, offices
Unattended deaths Hotels, apartments, office buildings, storage units
Bodily fluids, vomit and feces Restrooms, restaurants, schools, transit and lobbies
Sewage backups Restaurants, ground-floor retail, medical and dental offices
Needles and encampment cleanup Vacant buildings, loading docks, stairwells, lots

Whatever the cause, the response is the same: contain it, remove contaminated material, disinfect with hospital-grade products, and dispose of the waste as regulated medical waste. Our biohazard cleanup service page covers residential and commercial calls.

What Dallas employers are responsible for

If employees could reasonably be exposed to blood or other infectious materials on the job, the federal OSHA Bloodborne Pathogens Standard applies. In plain terms, the employer is expected to:

  • Have a written exposure control plan for the jobs that carry risk.
  • Train exposed employees and provide gloves, eye protection and other protective equipment.
  • Offer the hepatitis B vaccine to employees with occupational exposure.
  • Clean and decontaminate contaminated surfaces with an appropriate disinfectant.
  • Handle and dispose of regulated waste properly.

Many businesses meet that last set of duties by bringing in a professional crew instead of training and equipping their own staff for something that rarely happens. Regulated medical waste in Texas also has to be packaged and moved by an authorized transporter, not put in the dumpster.

What your staff shouldn’t do

Unless they’ve been trained and equipped for it, employees shouldn’t mop up blood, throw stained materials in the trash, or spray a household cleaner and call it done. Keep people out of the area, cover small spills with absorbent material if it’s safe to, and call a biohazard team.

What commercial biohazard cleanup looks like

A good crew works quickly and quietly, and plans around keeping your business running. A typical commercial job runs like this:

  1. Response and assessment. We confirm what happened, where the contamination went and whether police or the medical examiner have released the scene.
  2. Containment. We close off the area and set up a work zone so employees and customers can stay out, often while the rest of the building stays open.
  3. Removal. Saturated carpet, ceiling tiles, drywall, upholstery and other porous materials are cut out and packaged as regulated waste. Blood travels farther than it looks, under flooring and into seams.
  4. Cleaning and disinfection. Hard surfaces are cleaned and then treated with EPA-registered, hospital-grade disinfectants, with the right contact time.
  5. Deodorization. Odor treatment where it’s needed, especially after an unattended death or sewage.
  6. Waste disposal and documentation. Waste leaves with an authorized medical-waste transporter, and you get documentation for your records, your insurer and, where it applies, OSHA.

For a closer look at the crew itself, read what a biohazard team does, and for spills, how blood spill cleanup is done safely.

Keeping your Dallas business open

Downtown and Uptown offices, Deep Ellum and Bishop Arts restaurants, hotels, distribution centers along Stemmons and in the Inland Port: they all have the same priority after an incident, which is getting back to normal without anyone getting hurt or anything getting posted online. A few things help:

  • After-hours and overnight work so cleanup happens when customers and staff aren’t there.
  • Partial closures, where only the affected area is sealed off and the rest of the building operates.
  • Discretion. We keep a low profile on site and don’t discuss the job.
  • One point of contact for property management, insurance and your own leadership.

Does insurance cover commercial biohazard cleanup?

Often, at least in part. Commercial property policies frequently cover cleanup tied to a covered event like vandalism, a break-in or a sewage backup, but coverage and deductibles vary. Call your agent early. We document the scene, the scope and the waste disposal so your adjuster has what they need. For a sense of pricing, see our DFW crime scene cleanup cost guide. The ranges there are industry averages, and to get a real quote for your property, contact our team.

Choosing a commercial biohazard cleanup company in Dallas

Before you need one, it’s worth knowing who you’ll call. Ask:

  • Do you answer and respond 24/7, including weekends and holidays?
  • Are your technicians trained in bloodborne pathogens and supplied with proper PPE?
  • Who transports and disposes of the regulated waste, and will I get documentation?
  • Can you work after hours or around my operations?
  • Will you work directly with my insurance carrier and property manager?

Saving the number in your facility manager’s phone before an incident saves time on the worst day. Tarrant County businesses can see our Fort Worth biohazard cleanup page.

Biohazard at your Dallas business?

Superior Environmental Services provides 24/7 commercial biohazard, trauma and crime scene cleanup across Dallas–Fort Worth. We’re discreet and can work after hours.

Call 24/7: (469) 283-5227

Frequently asked questions

Can my employees clean up blood at work?

Only if they’re trained and equipped under your bloodborne pathogens program, with proper protective equipment, disinfectants and waste handling. Most businesses don’t keep staff trained for that, which is why a professional biohazard team is the usual call for anything beyond a very small spill.

How fast can a biohazard team get to a Dallas business?

We answer 24/7/365 and can usually be on site the same day. Many commercial jobs start overnight so the business can reopen the next morning.

Do we have to close while the cleanup happens?

Usually not completely. The affected area is sealed off as a work zone, and the rest of the building can often stay open. Where that isn’t practical, we schedule the work after hours.

Can’t our janitorial company handle it?

Most janitorial services aren’t trained, equipped or set up to dispose of regulated medical waste. Blood and bodily fluids need specialized protective equipment, hospital-grade disinfectants, removal of soaked materials and disposal through an authorized transporter.

What does commercial biohazard cleanup cost?

It depends on the type of incident, how far contamination spread, what materials have to be removed and whether work happens after hours. Small spills cost far less than an unattended death or a large sewage event. Industry averages are in our cost guide, and to get a real quote for your property, contact our team.

What Does Asbestos Insulation Look Like? (ID Chart by Type)

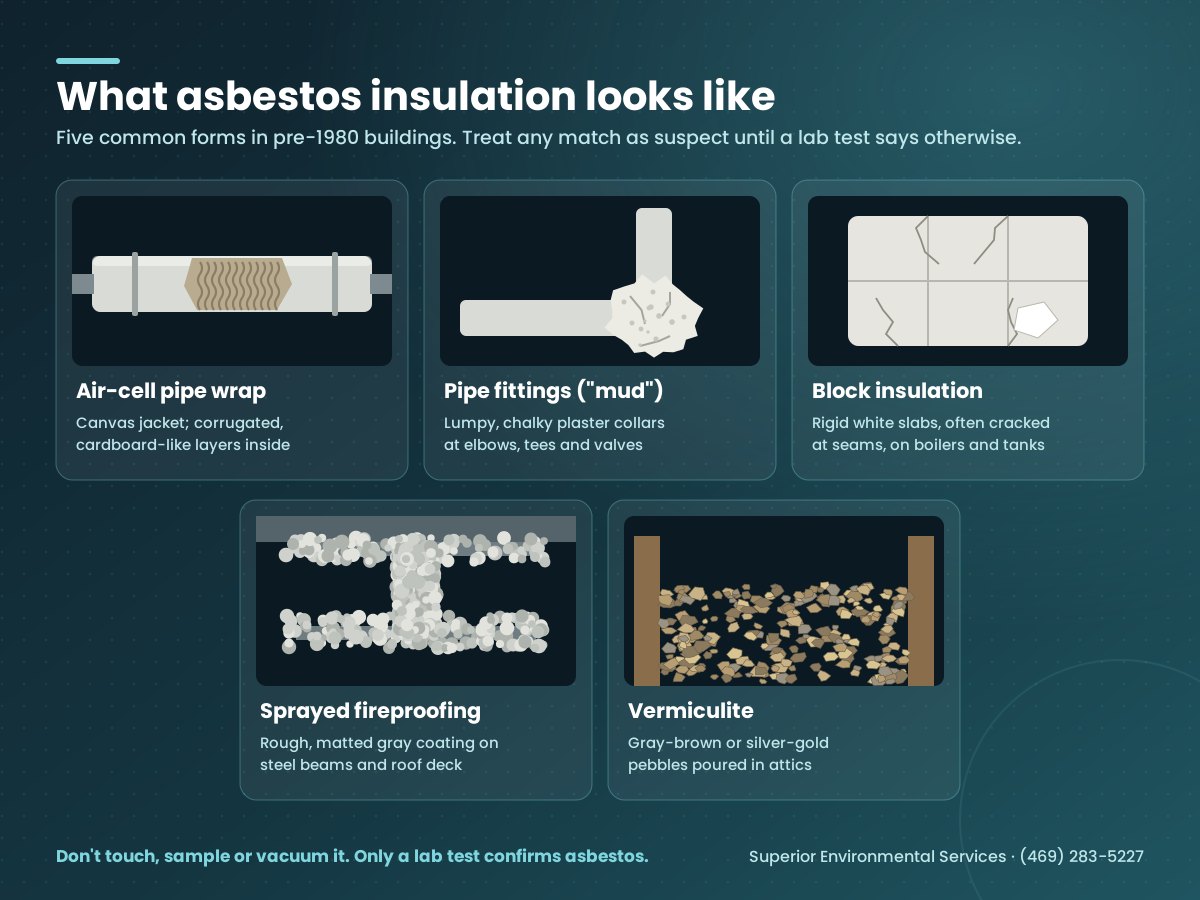
Asbestos insulation comes in five common forms. Each looks different: corrugated gray-white pipe wrap, chalky plaster-like elbows on pipe fittings, rigid white block on boilers and tanks, rough gray spray-on fireproofing, and pebbly gray-brown or silver-gold vermiculite in attics. The catch is that none of them can be confirmed by sight. This guide shows you what to look for and where it hides in Dallas–Fort Worth buildings, and how to get a definite answer without disturbing it.

Identification chart showing what the five types of asbestos insulation look like: pipe wrap, pipe fittings, block insulation, sprayed fireproofing and vermiculite
The five forms of asbestos insulation. A lab test is the only way to confirm any of them.

Asbestos insulation identification chart

Use this to narrow down what you’re looking at. Anything that matches and was installed before about 1980 should be treated as asbestos-containing until a lab says otherwise.

Type What it looks like Where you’ll find it Risk if damaged
Air-cell pipe wrap White or gray canvas jacket; ridged, cardboard-like corrugated layers where it’s torn Hot water and steam lines, mechanical rooms, older commercial buildings High (friable)
Pipe fittings (“mud”) Lumpy, chalky white or gray plaster collars at elbows, tees and valves Wherever wrapped pipe turns or meets a valve High; often cracks first
Block insulation Rigid white to light-gray slabs, usually under a cement or canvas skin with cracks at the seams Boilers, furnaces, tanks, breeching High when cracked
Sprayed-on fireproofing Rough, matted gray or off-white layer, somewhere between cotton candy and stucco Structural steel and deck above ceiling tiles in commercial and multifamily buildings High (friable)
Vermiculite Loose, lightweight pebbles, gray-brown or silver-gold, from grains up to about an inch Attics and some wall cavities, poured between joists High when disturbed

The short version

Don’t touch it, sample it yourself or vacuum it. If it’s intact, leave it alone. If it’s damaged, close off the area and have it tested. Asbestos testing is the only way to know.

What does asbestos pipe insulation look like?

Pipe insulation is the most recognizable form, and it comes in two parts that often test differently.

Corrugated air-cell pipe wrap

Layers of corrugated paper wrapped around a pipe and finished with a white or gray canvas jacket, which is sometimes painted. Where the jacket is torn, the corrugation shows as a ridged pattern, grayish white or tan with age, a lot like the inside of a cardboard box. It was standard on steam and hot water lines, and it grows fragile as it ages.

Plaster-like elbows and fittings

Straight wrap won’t bend around a corner, so insulators packed a wet asbestos-containing “mud” into elbows, tees and valves and smoothed it over. Cured, it looks like a lumpy plaster collar, chalky white or gray. These fittings often contain more asbestos than the straight runs and crack more easily. It’s common to find wrap in decent shape with crumbling fittings at every turn.

What does asbestos block insulation look like?

Block insulation comes as rigid, preformed blocks or slabs, white to light gray, fitted around boilers, furnaces, water tanks and large ducts and then covered with a cement coating or canvas. It looks solid and chalky rather than fibrous. Usually all you see is a thick, painted shell with cracks running out from the corners and seams. Where the shell has broken, the block underneath looks like dense, dry chalk or compressed white board.

In DFW you’ll mostly find block insulation in commercial boiler rooms, schools, churches, hospitals and older industrial buildings rather than houses, because most North Texas homes were heated with forced air, not boilers.

What does sprayed-on asbestos fireproofing look like?

Sprayed fireproofing and acoustic surfacing went onto structural steel and the underside of floor and roof decks in commercial and multifamily buildings. It’s a rough, matted layer, gray to off-white, with a lumpy texture somewhere between cotton candy and stucco. Look above the suspended ceiling tiles and in mechanical rooms. That’s where electricians and cable installers damage it without realizing.

Federal OSHA rules treat it, along with pipe and boiler insulation, as presumed asbestos-containing material in buildings built through 1980 until testing proves otherwise. If you manage an older commercial building, our commercial asbestos survey page covers how that gets documented.

What does vermiculite (asbestos attic insulation) look like?

Vermiculite is a mineral that expands into lightweight, accordion-like pellets when it’s heated. Poured into an attic between the joists, it looks like a layer of small pebbles or coarse gravel, gray-brown or silver-gold, with pieces ranging from fine grains up to nearly an inch. It’s lighter than it looks and sometimes glitters in a flashlight beam.

The problem is where it came from. A mine near Libby, Montana supplied most of the vermiculite sold in the United States from 1919 to 1990, and that deposit was contaminated with asbestos. Much of it was sold as Zonolite. Not every bag contained asbestos, but enough did that the EPA’s advice is simple: assume vermiculite attic insulation contains asbestos, leave it undisturbed and don’t store things in that attic.

What does asbestos wall insulation look like?

This is one of the most common questions, and the honest answer is that most walls don’t have it. Asbestos wall insulation usually turns out to be one of three things:

  • Vermiculite poured into wall cavities. The same pebbly gray-brown or silver-gold material as attic vermiculite. It sometimes spills out of outlets or holes in older homes.
  • Insulating board or batts in older commercial walls. Rare in houses, but some older commercial and institutional buildings used asbestos-containing board.
  • Not insulation at all. More often, asbestos in a wall is in the drywall joint compound, wall texture or plaster, not the insulation behind it. In pre-1980 homes, test those before you sand or demo.

What asbestos insulation is not

Pink or yellow fiberglass batts aren’t asbestos. Neither is blown-in cellulose (gray, shredded paper), mineral wool, rock wool or spray foam. But the presence of one doesn’t rule out the others. Newer insulation is often installed right on top of older material, and a modern batt next to a boiler says nothing about what’s under the boiler jacket.

If it looks like… It’s probably… Asbestos concern?
Pink, yellow or white fluffy batts with a paper or foil face Fiberglass No, but check what’s under it
Gray, shredded paper blown loose Cellulose No
Gray-brown or silver-gold pebbles Vermiculite Yes, assume it is
Corrugated wrap or plaster collars on pipes Air-cell wrap and fitting mud Yes, if pre-1980
Rigid chalky slabs on a boiler or tank Block insulation Yes, if pre-1980

Where asbestos insulation hides in DFW buildings

North Texas houses mostly use forced-air systems, so boiler and steam-pipe insulation is less common here than in older Northern cities. Where it does show up:

  • Attics of pre-1980 homes: vermiculite between the joists, plus asbestos-containing duct wrap and tape on older HVAC.
  • Older Dallas and Fort Worth neighborhoods: about half of Dallas housing predates 1980, and houses with original hydronic heat or water heater closets can still have pipe wrap.
  • Commercial buildings, schools and churches: pipe and boiler insulation in mechanical rooms, sprayed fireproofing above ceilings.
  • Older multifamily: pipe chases and mechanical rooms, sometimes behind drywall added later.

Condition matters more than type

Once a material is presumed or confirmed to contain asbestos, the useful question is what shape it’s in. Fibers are released when the material is disturbed or damaged. Intact, sealed material that’s left alone generally isn’t releasing anything.

Good condition means an unbroken jacket, no cracking or crumbling, no dust or debris on surfaces below and no water staining. Insulation like that is often best managed in place, because removing it disturbs it.

Faster action is warranted with torn jacketing, crumbling fittings, powder or chunks on the floor, water damage from a roof or pipe leak, or a past renovation that cut into insulation without controls. Finding damaged insulation doesn’t mean harm has occurred. It means the material should be evaluated and stabilized or removed under controls, with people kept out of the area in the meantime.

Don’t investigate it yourself

The natural impulse is to get closer, peel back a corner of the jacket or break off a piece. Each of those does exactly what you’re trying to prevent. Don’t touch, poke, cut, sweep or vacuum suspect insulation, and don’t take your own sample. Household vacuums pass the fine fibers straight through. If material is damaged, close the door, keep people and pets out, and shut off any HVAC system that pulls air from that space.

How testing gives you a definite answer

A lab is the only way to know. Bulk samples are taken under controls (the material is wetted, the area isolated and each sample sealed) and analyzed by polarized light microscopy at an accredited laboratory. The analysis shows whether asbestos is present, which type, and roughly what share of the material it makes up. Each distinct material should be sampled separately, since pipe wrap and its fittings can come back different.

Our asbestos testing service handles sampling and accredited lab analysis, and our guide to asbestos testing costs in DFW lays out typical industry ranges. For the bigger picture across all building materials, see what asbestos looks like.

If the insulation has to come out

Asbestos abatement is a controlled process, not a demolition job. The work area is sealed and put under negative air pressure, the material is wetted and removed without breaking it up more than necessary, and the waste goes to a permitted facility. The job closes with verification: clearance air testing confirms the area is safe before anyone goes back in.

Not sure what’s in your attic or mechanical room?

Superior Environmental Services is a licensed, insured team based in Plano, serving Dallas, Tarrant, Collin and Denton counties. We sample under controls, use accredited labs and can usually be on site within 24 hours.

Call (469) 283-5227

Frequently asked questions

Can you tell if insulation has asbestos just by looking at it?

No. Appearance can tell you a material is suspect, like corrugated pipe wrap, plaster-like fittings or vermiculite, but only laboratory analysis can confirm asbestos. Treat suspect insulation in a building from before about 1980 as asbestos-containing until it’s tested.

What color is asbestos insulation?

Most asbestos pipe, block and sprayed insulation is white, off-white or gray, sometimes painted or yellowed with age. Vermiculite is gray-brown or silver-gold. Color doesn’t confirm or rule out asbestos.

Is all vermiculite insulation asbestos?

Not all of it, but much of the vermiculite sold in the U.S. before 1990 came from a mine contaminated with asbestos. The EPA recommends assuming vermiculite attic insulation contains asbestos and leaving it undisturbed unless it’s tested or removed by professionals.

Is asbestos insulation dangerous if I leave it alone?

Intact, undamaged asbestos insulation that isn’t disturbed generally doesn’t release fibers. The risk comes from damage, deterioration or disturbance during repairs and renovation. That’s why condition, not just presence, decides what to do.

How much does it cost to test insulation for asbestos?

Across the industry, testing one or two suspect materials typically runs about $250 to $600, depending on the number of samples and how fast you need results. Those are industry averages, not our quotes. To get a real quote, contact our team.

How Much Does Hoarding Cleanup Cost? (2026 Guide)

Hoarding cleanup is one of the hardest services to price over the phone, because no two homes are alike. But you deserve a realistic number before you call anyone. This guide breaks down what hoarding cleanup typically costs across the industry, how companies price it, what drives the number up or down, and how families in Dallas–Fort Worth keep it manageable.

The short version

  • Industry averages for a whole-home hoarding cleanup run roughly $2,500 – $12,000; severe homes with biohazards can exceed $25,000.
  • Volume, severity level, biohazards and how much careful sorting is needed drive most of the price.
  • Insurance rarely pays for the clutter itself, but may cover damage found underneath.
  • Deciding what to keep before cleanup starts is the single biggest way to save money.
  • These are industry averages, not SES quotes — contact our team for a real one.

Average hoarding cleanup cost by home size

The ranges below are average prices across the hoarding cleanup industry — a planning reference, not SES quotes.

ScopeIndustry averageTypical time
Single room or garage$800 – $2,5001 day
Apartment or small home, light-to-moderate$2,000 – $5,0001 – 3 days
Full home, light-to-moderate$2,500 – $6,0002 – 4 days
Full home, severe$6,000 – $12,0004 – 8 days
Severe with biohazards, animal waste or decomposition$12,000 – $25,000+1 – 3 weeks

These are industry averages, not quotes. Every home is different. To get a real quote for your situation, contact our team or call (469) 283-5227 for a free on-site estimate with a written scope.

Cost by hoarding level

Professional organizers and cleanup companies commonly describe hoarding on a five-level clutter-hoarding scale. The level is a better predictor of cost than square footage alone, because it tells you how much of the work is hauling versus hazardous cleanup.

LevelWhat it typically looks likeCost impact
1Cluttered but functional; doors, stairs and exits clearLowest — mostly organizing
2Some rooms hard to use, mild odor, light pet messModerate hauling
3Rooms unusable, clutter outside, appliances not workingHeavy hauling, deep cleaning
4Rotting food, pest activity, animal waste, structural concernsBiohazard work begins
5Unsafe structure, no working utilities, human or animal waste throughoutHighest — full biohazard scope

How companies price hoarding cleanup

Hourly, per technician

Many companies bill per worker per hour — commonly $50 to $100 per technician per hour across the industry — plus disposal. It sounds transparent, but the total is open-ended and hard to budget.

By volume or dumpster

Some price by the number of truckloads or roll-off dumpsters. A heavily hoarded 1,500-square-foot home can fill several 30-yard dumpsters.

Flat-rate, written scope

A walkthrough produces a fixed scope and price for the whole job. This is the easiest to budget and the fairest for families, because the crew carries the risk of underestimating. Always ask what’s included and what would change the price.

What drives the cost

  • Volume. The single biggest factor — more items means more labor, more hauling and more disposal fees.
  • Severity and biohazards. Animal waste, spoiled food, pests or decomposition require PPE, disinfection and regulated disposal. See biohazard cleanup.
  • Sorting. Going item by item for documents, photos, cash and keepsakes takes longer than a straight clean-out — but for most families it’s non-negotiable.
  • Access. Second floors, narrow paths, no driveway, HOA dumpster rules and long carries all add labor.
  • Timeline. Rush jobs before a closing, court date or move-in may need larger crews.

Want a real number for your situation? Walkthroughs and written estimates are free.

Call (469) 283-5227

Costs people don’t expect

Once floors and walls are visible again, the house often tells you more. Common add-ons across the industry include:

  • Mold. Leaks hidden under piles for years are common. Mold testing and remediation are priced separately.
  • Flooring and drywall. Urine-soaked subfloor and damaged drywall may need removal before the home can be sold or rented.
  • Pest control. Usually handled by a licensed exterminator before or after cleanup.
  • Odor treatment. Deep odor removal after animal waste or decomposition.
  • Older-home hazards. In pre-1980 homes, damaged ceilings or flooring may need asbestos testing before removal.

Who pays for hoarding cleanup?

  • The homeowner or family pays in most cases.
  • Estates pay when cleanup is part of settling a property after a death.
  • Landlords pay to restore a unit, then may pursue the tenant’s deposit or damages.
  • Insurance generally doesn’t cover clutter removal, but may cover sudden damage discovered during cleanup — a burst pipe or fire, for example. Document conditions before work starts.
  • Community programs. Some county adult protective services and aging programs can help in specific situations; it’s worth a call if a vulnerable adult is involved.

How to keep costs down

  1. Decide what to keep before the crew arrives. Agree on categories — documents, photos, jewelry, specific furniture — so sorting moves quickly.
  2. Ask for a fixed, written scope instead of open-ended hourly billing.
  3. Don’t wait. Leaks, pests and mold get more expensive every month they’re left alone.
  4. Donate and recycle where possible to reduce disposal fees.
  5. Bundle the work. Using one company for cleanup, biohazard and mold avoids paying multiple crews to mobilize.

DIY vs. professional hoarding cleanup

Families can sometimes handle a Level 1 or 2 home with a rented dumpster and a few weekends. Once there’s animal or human waste, rotting food, pests, mold or structural concern, it’s a professional job — the health risks are real, and the emotional toll on family members is often underestimated. A professional crew also keeps the process moving when a loved one is struggling with letting go.

Hoarding cleanup in Dallas, Fort Worth and Plano

Superior Environmental Services provides compassionate, judgment-free hoarding cleanup across DFW — Fort Worth and Arlington, Dallas, Denton County and Collin County. For the full process, read our complete guide to hoarding cleanup services, or see our hoarding cleanup FAQs.

Frequently asked questions

How much does hoarding cleanup cost on average?

Industry-wide, most whole-home hoarding cleanups average about $2,500 to $12,000. Single rooms cost less; severe homes with biohazards can exceed $25,000. These are industry averages only — to get a real quote, contact our team for a free on-site estimate.

How much does it cost to clean a hoarder house per square foot?

Square footage is a weak predictor on its own. Volume and severity matter more: a small apartment at Level 4 can cost more than a large house at Level 2. That’s why reputable companies quote after a walkthrough.

Does insurance cover hoarding cleanup?

Generally not for clutter removal itself. Insurance may cover sudden damage discovered during cleanup, such as a burst pipe or fire.

How long does a hoarding cleanup take?

Most moderate homes take two to five days. Severe cases can take one to three weeks, especially when the family is sorting keepsakes alongside the crew.

Can the homeowner be involved in the cleanup?

Yes, and it often helps when it’s healthy for them. A good crew works at a pace the person can handle and never discards anything on the keep list.

Get a free hoarding cleanup estimate

Discreet, compassionate hoarding cleanup across Dallas–Fort Worth, with a written scope before any work begins.

Call (469) 283-5227Request a free estimate

Hoarding Cleanup Services: Process, Cost & What to Expect

Reaching out for help with a hoarding situation — whether for yourself, a family member, or a property you manage — takes courage. It’s rarely just a cleaning problem: severe clutter can hide biohazards, structural damage, pests, and mold, and the people involved deserve to be treated with dignity, not judgment. This guide walks through exactly what professional hoarding cleanup involves so there are no surprises.

What is professional hoarding cleanup?

Hoarding cleanup is a specialized service that goes well beyond junk removal. It combines clutter and debris removal with deep cleaning, decontamination, and often biohazard handling — carried out by trained crews who understand both the health risks and the emotional weight of the situation. The goal isn’t just an empty room; it’s a home that’s safe, sanitary, and livable again. For a closer look at the crews and roles involved, see what hoarding cleanup companies do.

What’s included

A professional hoarding cleanup typically covers:

  • Sorting and clutter removal — handled with sensitivity, keeping the resident involved in decisions where possible.
  • Junk and debris hauling — with respectful, discreet disposal.
  • Biohazard decontamination — addressing waste, mold, and contamination that pose real health risks.
  • Safe disposal of hazardous materials — following proper handling and disposal rules.
  • Deep cleaning and sanitizing — floors, surfaces, and fixtures returned to a healthy standard.
  • Odor removal — treating the source, not masking it.
  • Salvage of valuables — recovering important belongings and documents along the way.
  • Structural and repair coordination — identifying damage hidden underneath the clutter.

What to expect: the process step by step

Knowing the sequence takes a lot of the anxiety out of it. Most cleanups follow the same path — and you can read a first-hand-style walkthrough in what a typical hoarder house cleanup is like:

  1. Assessment. A specialist evaluates the property, identifies hazards, and builds a plan and quote.
  2. Plan & consent. The scope, timeline, and approach are agreed on — with the resident’s wishes respected.
  3. Removal. Clutter and debris are cleared systematically, room by room, salvaging what matters.
  4. Decontamination. Biohazards, mold, and contamination are treated and removed safely.
  5. Cleaning & restoration. The space is deep-cleaned, deodorized, and prepared for any needed repairs.

Why this isn’t a DIY job

Beyond the sheer volume, hoarding environments often conceal biohazards, heavy mold growth, pest infestations, and unstable footing. Disturbing them without protection and proper containment can spread contamination and expose everyone involved to serious health risks. Trained crews bring the equipment, safety protocols, and disposal channels to do it safely — and the compassion to do it respectfully.

How much does hoarding cleanup cost?

Cost depends on the situation, but professional hoarding cleanup generally starts around $1,300 for assessment and removal planning, and rises from there based on the specifics. The main factors that move the price:

  • Property size and the number of rooms affected.
  • Volume of clutter and how much must be hauled and disposed of.
  • Biohazard level — contamination, waste, or heavy mold require more time and specialized handling.
  • Structural damage uncovered during the work.

For a fuller breakdown, see how much hoarding cleanup costs and our detailed hoarding cleanup FAQs.

A compassionate, confidential approach

The best hoarding cleanup teams lead with respect. Discretion, privacy, and the resident’s dignity come first — this is a health and wellbeing situation, not a verdict on anyone. If you’re helping a loved one, know that a calm, judgment-free professional process is often what makes it possible for them to accept help at all.

Serving the DFW metroplex. Superior Environmental Services provides discreet, professional hoarding cleanup across Texas and the Dallas–Fort Worth area — licensed, insured, and handled with care.

Compassionate help is one call away

Discreet, licensed, and insured hoarding cleanup across Dallas–Fort Worth. We handle the hazards and the hauling — with respect, privacy, and care from start to finish.

Get a Confidential Quote

How to Get Rid of Mold Without Spreading Spores

The instinct when you spot mold is to grab a spray bottle and wipe it away. But mold reproduces by releasing microscopic spores, and aggressive dry-scrubbing or a fan pointed the wrong way can send those spores drifting into other rooms, your HVAC system, and your lungs. Removing mold without spreading it comes down to one idea: contain first, then clean gently, then verify the source is gone.

Why spreading spores is the real danger

A visible mold patch is only part of the colony — the rest is airborne potential. Disturb it carelessly and you don’t just fail to solve the problem, you multiply it: spores settle on damp surfaces elsewhere and start new growth days later. That’s why a job that looks like a five-minute wipe can turn into mold showing up in three new spots the following week. Doing it right the first time is faster than chasing it around the house.

Before you start: is this a DIY job at all?

A small patch — think smaller than a couple of square feet on a hard, non-porous surface like tile or glass — is generally safe to handle yourself with the right precautions. Step back and call a professional if any of these are true:

  • The affected area is larger than roughly 10 square feet (and in Texas, cleanups of 25+ contiguous square feet legally require a licensed remediator).
  • The mold is on porous material like drywall, insulation, or carpet — see whether the drywall needs to come out.
  • It came from sewage or contaminated water.
  • Anyone in the home has asthma, allergies, or a weakened immune system.
  • You can smell mold but can’t find it — it may be inside walls or ductwork.

Not sure which category you’re in? Our guide on whether it’s safe to remove mold yourself breaks it down further.

Step by step: removing mold without spreading it

  1. Gear up first. Put on an N95 respirator, gloves, and eye protection before you disturb anything. This protects your lungs from the spores you’re about to loosen.
  2. Contain the area. Seal the room off with plastic sheeting over doorways and vents, and turn off your HVAC system so the air handler doesn’t pull spores building-wide. This one step prevents most cross-contamination.
  3. Control the air the right way. Don’t point a household fan at the mold — that’s what spreads it. If you ventilate, open a window to the outside and let air move out, away from the rest of the house.
  4. Mist, don’t dry-scrub. Lightly dampen the surface first. Wet spores don’t travel; dry scrubbing sends them airborne. Clean gently with a detergent solution rather than blasting it.
  5. Skip the “kill it” myths. Bleach and vinegar are widely misused — here’s what actually works between vinegar and bleach. On porous surfaces, “killing” the mold doesn’t remove the spores or the staining.
  6. Bag it immediately. Seal used rags, sponges, and any removed material in a plastic bag inside the contained area before carrying it out, so nothing sheds spores on the way to the trash.
  7. Dry the area completely. Mold returns wherever moisture does. Get the surface fully dry and keep it that way.

The step almost everyone skips: fixing the moisture

Mold is a symptom. If you clean the spot but leave the leak, the humidity, or the condensation that fed it, it comes back — often within weeks. Finding and fixing the moisture source is the difference between removing mold and just relocating your next mold problem. It’s also the part homeowners most often can’t see, because the source is frequently behind the surface.

What about spores already in the air?

Even a careful cleanup stirs some spores loose. Improving filtration and letting the space air out afterward helps — more on that in getting rid of mold spores in the air. If symptoms or smell linger after you’ve cleaned, that’s a strong sign there’s more mold than what you could see.

When to call a professional

If the area is large, on porous materials, hidden behind walls, or tied to a moisture problem you can’t locate, DIY stops being the safe or the cheaper option. A certified team contains the space properly, removes the source rather than the surface, and confirms the air is clear afterward — so you’re not repeating the job next season. Superior Environmental Services provides professional mold removal across the DFW metroplex, finding and fixing the cause, not just the spot.

Not sure if you should DIY or call for help? Take our free Home Environmental Risk Checker — six quick questions for an instant read on how serious your mold situation really is.

Get it removed right the first time

Certified mold testing and removal across Dallas–Fort Worth — contained, thorough, and source-fixed. Licensed, insured, on-site within 24 hours.

Request a Free Quote

Why Fort Worth’s Historic Homes Are Prone to Lead Paint

Fort Worth’s historic neighborhoods are some of the most sought-after addresses in North Texas. But the same age that gives these homes their character also makes them far more likely to contain lead-based paint — a hazard that hides in plain sight on windows, doors, and porches.

The 1978 cutoff that defines the risk

In 1978, the U.S. Consumer Product Safety Commission banned lead in residential paint. That single date is the dividing line for risk: homes built before it are likely to contain lead-based paint somewhere, while homes built after it generally are not.

The scale is bigger than most people realize. An estimated 31 million pre-1978 homes in the U.S. still contain lead-based paint, and roughly 3.8 million of them have at least one child under the age of six living inside.

Why Fort Worth’s historic districts are especially affected

Fort Worth has an unusually deep stock of early-1900s housing. The Fairmount/Southside Historic District alone covers about a square mile and includes more than 1,000 contributing buildings — most of them wood-frame bungalows built between roughly 1905 and 1920. Nearby districts like Ryan Place, Mistletoe Heights, and Elizabeth Boulevard tell a similar story.

Two things make these homes higher-risk than a typical pre-1978 house:

  • Age multiplies the hazard. The older the paint, the higher its lead content tends to be. Paint from the early 1900s often contained dramatically more lead than paint sold in the 1960s or 1970s.
  • Layers add up. A 110-year-old home may have a dozen coats of paint, with the oldest, most lead-heavy layers sitting underneath newer ones — ready to be released the moment someone sands or scrapes.

Where lead paint hides in an old home

Lead paint becomes dangerous mainly when it deteriorates or gets disturbed. The usual hot spots in a historic Fort Worth home are friction and impact surfaces, where paint rubs, chips, and turns to dust:

  • Window sashes, sills, and jambs (the single most common source)
  • Doors and door frames
  • Baseboards, trim, and crown molding
  • Porches, railings, and exterior siding
  • Stair treads and banisters

Who’s most at risk

Children under six are the most vulnerable, because their bodies are still developing and because crawling and hand-to-mouth habits make them likely to ingest lead-contaminated dust. Even low levels of exposure can contribute to lower IQ, developmental delays, and behavioral problems. Pregnant women are also at elevated risk. This is why deteriorating paint in an older home with young children is treated as an urgent situation rather than a cosmetic one.

The renovation trap

Most lead exposure in historic homes doesn’t come from the paint just sitting there — it comes from disturbing it. Sanding a window, scraping trim, or tearing out plaster can fill a room with lead dust in minutes. That’s why federal rules require contractors working on pre-1978 housing to be trained and certified in lead-safe work practices. A weekend DIY sanding project can do more harm than years of intact paint.

Buying or restoring a historic home?

Get the home tested before you start any work — not after. Knowing exactly where the lead is lets you plan around it, budget for lead-safe handling, and protect your family during the project instead of cleaning up dust afterward.

How to know for sure

You can’t identify lead paint by looking at it, and home test swabs are notoriously unreliable on layered surfaces. The dependable path is a professional lead paint test, which can pinpoint which surfaces are coated in lead and whether dust levels are already a hazard. If you’re planning to renovate, pairing it with an asbestos survey is smart, since homes of this vintage frequently contain both.

Not sure where your home stands? Try our free Home Environmental Risk Checker — answer six quick questions and get an instant read on your lead, asbestos, and mold risk.

Test before you renovate

Superior Environmental Services provides certified lead paint testing across Fort Worth and the DFW metroplex. Licensed, insured, and local.

Request a Free Quote

How to Prevent Mold Growth After a Leak or Flood

Mold is a common problem in homes, especially after water damage from leaks or floods. It’s important to act fast because mold can start to grow within 24-48 hours. Mold not only damages your home, but it can also cause health problems like allergies, coughing, and asthma. In this blog, we’ll explain simple steps to prevent mold growth after a leak or flood.

Why Is Mold Dangerous?

Mold is a type of fungus that grows in moist, warm environments. It spreads through tiny spores that float in the air. When these spores land on wet surfaces, they can start to grow and spread quickly. Mold can cause a musty smell and black or green spots on walls, ceilings, and floors. More importantly, it can make people sick, especially those with allergies or breathing problems.

Step 1: Act Quickly

The first thing to do after a leak or flood is to act fast. Mold can start growing in as little as 24 hours. The longer water sits, the more likely mold will develop. As soon as it is safe, start removing water from your home. You can use towels, mops, or a wet/dry vacuum to soak up as much water as possible. Be sure to remove water from carpets, rugs, and furniture, as these can easily trap moisture.

Step 2: Dry Everything Completely

Once the water is removed, you need to dry everything. This is a very important step because mold loves moisture. Open windows and doors to let fresh air in. If possible, use fans or dehumidifiers to help dry the air faster. Run your air conditioner if it’s hot outside, as it can also help to reduce humidity. Pay special attention to areas like basements, bathrooms, and kitchens, which tend to stay damp.

Step 3: Clean the Area

After drying the area, clean it to remove any dirt or bacteria that could help mold grow. Use a mild detergent or soap and water to scrub surfaces that were exposed to water. For extra protection, you can use a bleach solution (one cup of bleach in one gallon of water) to clean areas like floors, walls, and baseboards. Always wear gloves and a mask when using bleach, and make sure the area is well-ventilated.

Step 4: Get Rid of Wet Items

Some items that get wet, like carpets, upholstery, and insulation, might not be able to dry completely. These items can hold onto moisture and become a perfect place for mold to grow. If you can’t dry these items within 48 hours, it’s best to throw them away. Mold can spread from one object to another, so it’s safer to get rid of anything that stays damp for too long.

Step 5: Check for Hidden Water

Water can sometimes get trapped in places you can’t see, like behind walls or under floors. These hidden spots are where mold can grow without you even knowing it. After a flood or leak, check for signs of hidden moisture, like stains on walls, bubbling paint, or warped floors. If you think water is trapped, you might need to call a professional to help find and remove it.

Step 6: Control Humidity Levels

Keeping humidity levels low in your home can help prevent mold from growing in the future. Mold grows best in places with a humidity level of over 60%. To control humidity, use dehumidifiers, especially in damp areas like basements and bathrooms. Also, make sure your home is well-ventilated by using fans in bathrooms and kitchens. If you have an attic, make sure it’s properly ventilated, too.

Step 7: Keep an Eye Out for Mold

Even after you’ve cleaned up after a leak or flood, it’s important to keep an eye out for mold. Mold can sometimes grow in places you missed or in areas that weren’t dried properly. Regularly check your home for signs of mold, such as a musty smell or spots on the walls. If you do see mold, clean it up right away or call a professional to remove it.

Final Thoughts

Preventing mold after a leak or flood doesn’t have to be hard. The key is to act fast, dry everything completely, and clean the area thoroughly. By following these steps, you can protect your home and your family’s health from the dangers of mold. Remember, if you ever feel like the mold problem is too big to handle on your own, it’s always best to call in a professional for help. Mold can be tricky, but with the right steps, you can keep it from becoming a big problem.

Additional Resources:

Biohazard Cleanup: What Happens After a Trauma or Crime Scene

Dealing with a trauma or crime scene in your home can be incredibly overwhelming. Whether it’s an accident, a crime, or an unexpected event, biohazard cleanup is a necessary step to ensure your home is safe again. Biohazards, such as blood, bodily fluids, and other harmful materials, can pose serious health risks if not handled properly. In this blog post, we’ll walk you through what biohazard cleanup involves, why it’s important, and how professionals help restore your home to a safe, clean condition.

What is Biohazard Cleanup?

Biohazard cleanup is the process of cleaning and disinfecting areas where harmful biological materials are present. These materials can include blood, bodily fluids, human waste, and even chemicals used in a crime or accident. Biohazards can carry dangerous pathogens, like bacteria or viruses, that can cause infections or illnesses. That’s why it’s crucial to have a professional biohazard cleanup team handle the job.

Why is Biohazard Cleanup Necessary?

When a trauma or crime occurs, the affected area may be contaminated with hazardous materials. These materials can spread diseases or cause long-term health issues if not properly removed. Regular cleaning supplies and methods are not enough to safely clean biohazards. In fact, trying to clean it yourself can expose you to harmful substances.

Biohazard cleanup is not just about making the area look clean—it’s about thoroughly sanitizing the space to make sure it’s safe for anyone to live or work in again. This is especially important in cases of unattended deaths, accidents, or crime scenes, where there may be a significant amount of biological waste.

What Happens During Biohazard Cleanup?

When a professional biohazard cleanup team, like Superior Environmental Services, arrives at your home, they will follow a detailed process to ensure everything is cleaned and restored safely. Here’s what typically happens:

  1. Assessment of the Area: The cleanup team will first assess the situation to determine the extent of the biohazard contamination. This step is important to figure out what needs to be cleaned and what materials may need to be removed.
  2. Containment of the Area: To prevent the spread of hazardous materials, the affected area is contained. This means sealing off parts of the house so that no one enters the contaminated space during the cleaning process.
  3. Removal of Hazardous Materials: The team will then remove any materials that are considered dangerous, such as blood, bodily fluids, and contaminated items like carpets, flooring, or furniture. They follow strict guidelines for the safe removal and disposal of these materials to protect everyone involved.
  4. Disinfection and Sanitization: After the hazardous materials are removed, the cleanup team will thoroughly disinfect the area. They use special cleaning agents designed to kill bacteria, viruses, and other pathogens that could still be present. This ensures the area is completely safe.
  5. Deodorizing the Space: Sometimes, biohazard situations can leave behind strong odors. The cleanup team will use special equipment to remove any lingering smells, ensuring your home is clean and fresh.
  6. Restoration of the Area: After the cleanup, the team will restore the area to its original condition as much as possible. This may include replacing flooring, walls, or other items that were damaged during the incident.

Why You Should Call Professionals

Biohazard cleanup is not something you should attempt on your own. Without proper training and equipment, you could be putting your health at risk. Professional biohazard cleanup teams have the experience and tools needed to safely remove hazardous materials and restore your home.

Moreover, they understand the emotional toll that a traumatic event can take on a family. Professionals work discreetly and compassionately, ensuring the cleanup process is handled with care and respect.

Final Thoughts

When a trauma or crime occurs in your home, biohazard cleanup is a critical step to make sure your space is safe again. With the help of professionals, you can rest assured that all hazardous materials are properly removed, and your home is restored. It’s not just about cleaning—it’s about protecting your health and well-being.

Related Content:

What to Do If You Discover Mold in Your Commercial Building

Finding mold in your commercial building can be alarming. Not only does it look unpleasant, but it can also cause serious health problems if left untreated. Mold thrives in damp environments, and once it starts growing, it spreads quickly. As a business owner or property manager, it’s important to take action right away. In this post, we’ll explain what mold is, how to spot it, and what steps you should take if you discover mold in your commercial building.

What is Mold?

Mold is a type of fungus that grows in warm, moist places. It can appear in different colors like black, green, or white, and sometimes it looks fuzzy. Mold can grow on almost any surface, including walls, ceilings, carpets, and furniture. When mold grows indoors, it can release tiny spores into the air, which can cause allergic reactions and other health issues. Common symptoms of mold exposure include coughing, sneezing, itchy eyes, and difficulty breathing.

How to Spot Mold in Your Building

The first step in dealing with mold is recognizing it. Mold often grows in places that are damp, like bathrooms, basements, or areas with water damage. Look for discolored patches on walls, ceilings, or floors. If you notice a musty smell in your building, that could also be a sign of mold. Sometimes, mold can grow behind walls or under carpets, making it harder to see.

It’s important to check for leaks or areas where water might be entering your building. Roof leaks, plumbing problems, or poor ventilation can create the perfect environment for mold to grow.

What to Do If You Find Mold

Once you discover mold in your commercial building, it’s essential to act quickly. Mold spreads fast, and delaying treatment can make the problem worse. Here are the steps you should follow:

  1. Identify the Source of Moisture: Mold needs moisture to grow, so the first thing you should do is find out where the water is coming from. It could be a leaky pipe, roof damage, or high humidity. Fixing the moisture problem is crucial to prevent the mold from coming back.
  2. Isolate the Affected Area: If the mold problem is in one part of the building, try to keep it from spreading to other areas. Close doors and cover vents to contain the mold spores. Avoid using fans, as they can blow the spores into the air and spread them throughout the building.
  3. Call a Professional Mold Remediation Service: Mold removal is not a DIY job. Handling mold can be dangerous, especially if it’s black mold, which is toxic. A professional mold remediation company, like Superior Environmental Services, has the equipment and expertise to remove mold safely and effectively. They will inspect your building, determine the extent of the mold growth, and clean and disinfect the affected areas.
  4. Clean and Dry the Area: Once the mold is removed, it’s important to clean and dry the area thoroughly. Any materials that were soaked, like carpets or drywall, may need to be replaced. Use a dehumidifier to reduce moisture levels and prevent future mold growth.
  5. Prevent Future Mold Growth: After the mold is gone, take steps to keep it from coming back. Regularly inspect your building for leaks and repair them quickly. Make sure your building is well-ventilated, especially in high-moisture areas like bathrooms and kitchens. Installing a dehumidifier can help keep the air dry, reducing the risk of mold growth.

Final Thoughts

Mold in a commercial building can be a serious problem, but it’s one that can be fixed. By identifying the source of moisture, acting quickly, and calling in professionals, you can protect your building and the people who work in it. Always remember, mold removal is best left to experts who can do the job safely and thoroughly.

Related Content:

Understanding Crime Scene Cleanup Services

When tragedy strikes, the aftermath can be overwhelming, especially when a crime scene or traumatic event involves biohazard materials. These situations require professional biohazard removal and crime scene cleanup services to ensure the area is safely and thoroughly cleaned. But what exactly do these services involve, and why are they so important? Let’s break it down.

What Is Biohazard Removal?

Biohazard removal involves the safe and proper cleanup of materials that could pose a risk to human health. These materials include blood, bodily fluids, and other potentially infectious substances. In situations like crime scenes, accidents, or unattended deaths, biohazards must be handled with extreme care to prevent contamination and the spread of disease.

Why It Matters: Biohazard materials can carry pathogens that are harmful to anyone who comes into contact with them. Proper removal is essential to protect the health of everyone involved and to restore the affected area to a safe condition.

What Is Crime Scene Cleanup?

Crime scene cleanup is a specialized service that involves the removal of biohazardous materials left behind after a violent crime, accident, or traumatic event. This service goes beyond standard cleaning, as it requires specific knowledge, skills, and equipment to handle dangerous materials safely. Crime scene cleanup professionals are trained to deal with various situations, including homicides, suicides, accidental deaths, and other traumatic events.

Why It Matters: Crime scene cleanup is not just about cleaning up a mess; it’s about restoring a space to its original state and ensuring it’s safe for others to occupy. This service is crucial for helping families and property owners move forward after a traumatic event.

What Does the Cleanup Process Involve?

The biohazard removal and crime scene cleanup process involve several key steps to ensure the area is thoroughly cleaned and decontaminated:

  1. Assessment of the Scene

The first step in the cleanup process is assessing the scene to determine the extent of the contamination and the necessary cleanup procedures. This helps the cleanup team develop a plan of action and identify the appropriate equipment and materials needed.

  1. Containment of the Area

Next, the affected area is contained to prevent the spread of biohazardous materials. This might involve sealing off the space with plastic sheeting or using specialized containment barriers.

  1. Removal of Biohazardous Materials

The cleanup team then safely removes all biohazardous materials, such as blood, bodily fluids, and contaminated items. These materials are carefully collected, stored in special containers, and disposed of according to local and federal regulations.

  1. Decontamination and Sanitization

After the biohazardous materials are removed, the area is thoroughly cleaned and decontaminated. This involves using professional-grade disinfectants and sanitizers to eliminate any remaining pathogens and ensure the space is safe.

  1. Restoration of the Area

In some cases, the cleanup process might also involve minor restoration work, such as repairing damaged walls or floors. The goal is to return the area to its pre-incident condition, making it safe and habitable once again.

Who Needs Crime Scene Cleanup Services?

Crime scene cleanup services are typically needed in situations where a traumatic event has occurred, including:

  • Homicides: The aftermath of a violent crime requires specialized cleanup to remove blood and other biohazard materials.
  • Suicides: Suicides often leave behind biohazardous materials that need to be handled with care and professionalism.
  • Accidental Deaths: Accidental deaths, such as falls or industrial accidents, can create hazardous conditions that require professional cleanup.
  • Unattended Deaths: When a person passes away and is not discovered for a period of time, the decomposition process can create dangerous biohazards that must be properly removed.

Why Professional Cleanup Is Necessary

Cleaning up a crime scene or biohazardous situation is not something that should be done by untrained individuals. There are several reasons why professional cleanup services are necessary:

  • Health and Safety: Biohazardous materials can carry infectious diseases that pose serious health risks. Professional cleanup teams are trained to handle these materials safely, protecting themselves and others.
  • Compliance with Regulations: Proper disposal of biohazardous materials is regulated by law. Professional cleanup companies know how to dispose of these materials in compliance with local and federal regulations.
  • Emotional Relief: Dealing with the aftermath of a traumatic event is emotionally challenging. Professional cleanup services provide much-needed relief by handling the difficult and hazardous task of cleaning up.

Final Thoughts

Biohazard removal and crime scene cleanup services are essential for ensuring the safety and well-being of those affected by traumatic events. Whether it’s a violent crime, accidental death, or any other situation involving biohazardous materials, these services provide the expertise and professionalism needed to restore safety and order. By choosing a reputable and experienced cleanup company, you can trust that the job will be done right, allowing you to focus on healing and moving forward.